People with write permissions for a repository can add content to a GitHub Pages site using Jekyll.
About content in Jekyll sites
Before you can add content to a Jekyll site on GitHub Pages, you must create a Jekyll site. For more information, see "Creating a GitHub Pages site with Jekyll."
The main types of content for Jekyll sites are pages and posts. A page is for standalone content that isn't associated with a specific date, such as an "About" page. The default Jekyll site contains a file called about.md, which renders as a page on your site at YOUR-SITE-URL/about. You can edit the contents of that file to personalize your "About" page, and you can use the "About" page as a template to create new pages. For more information, see "Pages" in the Jekyll documentation.
A post is a blog post. The default Jekyll site contains a directory named _posts that contains a default post file. You can edit the contents of that post, and you can use the default post as a template to create new posts. For more information, see "Posts" in the Jekyll documentation.
Your theme includes default layouts, includes, and stylesheets that will automatically be applied to new pages and posts on your site, but you can override any of these defaults. For more information, see "About GitHub Pages and Jekyll."
To set variables and metadata, such as a title and layout, for a page or post on your site, you can add YAML front matter to the top of any Markdown or HTML file. For more information, see "Front Matter" in the Jekyll documentation.
Changes to your site are published automatically when the changes are merged into your site's publishing source. If you want to preview your changes first, you can make the changes locally instead of on GitHub Enterprise Server. Then, test your site locally. For more information, see "Testing your GitHub Pages site locally with Jekyll."
Adding a new page to your site
-
On GitHub Enterprise Server, navigate to your site's repository.
-
Navigate to the publishing source for your site. For more information about publishing sources, see "About GitHub Pages."
-
In the root of your publishing source, create a new file for your page called PAGE-NAME.md, replacing PAGE-NAME with a meaningful filename for the page.
-
Add the following YAML frontmatter to the top of the file, replacing PAGE TITLE with the page's title and URL-PATH with a path you want for the page's URL. For example, if the base URL of your site is
https://octocat.github.ioand your URL-PATH is/about/contact/, your page will be located athttps://octocat.github.io/about/contact.layout: page title: "PAGE TITLE" permalink: /URL-PATH/ -
Below the frontmatter, add content for your page.
-
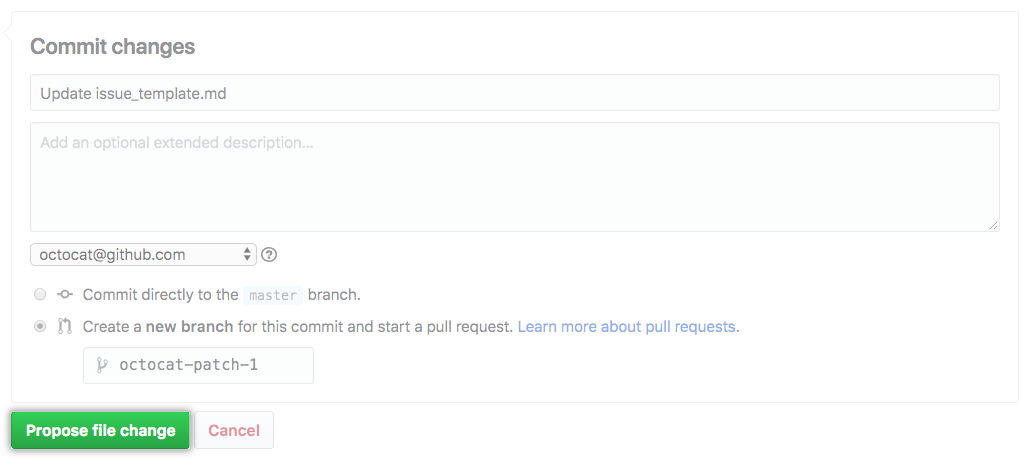
At the bottom of the page, type a short, meaningful commit message that describes the change you made to the file. You can attribute the commit to more than one author in the commit message. For more information, see "Creating a commit with multiple co-authors."

-
Below the commit message fields, decide whether to add your commit to the current branch or to a new branch. If your current branch is the default branch, you should choose to create a new branch for your commit and then create a pull request. For more information, see "Creating a new pull request."

-
Click Propose file change.
Adding a new post to your site
-
On GitHub Enterprise Server, navigate to your site's repository.
-
Navigate to the publishing source for your site. For more information about publishing sources, see "About GitHub Pages."
-
Navigate to the
_postsdirectory. -
Create a new file called YYYY-MM-DD-NAME-OF-POST.md, replacing YYYY-MM-DD with the date of your post and NAME-OF-POST with the name of your post.
-
Add the following YAML frontmatter to the top of the file, replacing POST TITLE with the post's title, YYYY-MM-DD hh:mm:ss -0000 with the date and time for the post, and CATEGORY-1 and CATEGORY-2 with as many categories you want for your post.
layout: page title: "POST TITLE" date: YYYY-MM-DD hh:mm:ss -0000 categories: CATEGORY-1 CATEGORY-2 -
Below the frontmatter, add content for your post.
-
At the bottom of the page, type a short, meaningful commit message that describes the change you made to the file. You can attribute the commit to more than one author in the commit message. For more information, see "Creating a commit with multiple co-authors."
-
Below the commit message fields, decide whether to add your commit to the current branch or to a new branch. If your current branch is the default branch, you should choose to create a new branch for your commit and then create a pull request. For more information, see "Creating a new pull request."
-
Click Propose file change.
Next steps
You can add a Jekyll theme to your GitHub Pages site to customize the look and feel of your site. For more information, see "Adding a theme to your GitHub Pages site using Jekyll."